Showing posts with label BREAD. Show all posts

Tuesday, November 11, 2014

thanksgiving skillet corn bread {bread bakers}


Yes, here it is... Thanksgiving... already! Seems like this year is flying by - but I guess that is what everyone says every year.

Two months into the school year and I am entrenched in meetings, organizing, planning. I love it! We've planted a winter bed of lettuce in the front school yard - hoping we can make it last the whole winter and be harvested for the kids' lunches. The sustainability Committee is getting reved up - and there's been talk of solar panels on the roof!! How awesome is that?! The Maker's Space my friend Diane organized and made beautiful is ready for use - we plan on creating a Pinterest baord full of craft ideas to implement learning the curriculum in all grades Pre-K to 5th.

And in just a few weeks we will eat more food than we can manage in a bucolic location, hopefully involving some snow (although that is not looking likely). Here is new take on the corn bread - sweet with frozen corn kernels scattered around. Makes for a nice surprise when you bite into it.

Thanksgiving Skillet Cornbread
Makes 6-8 servings, adapted from Cookie + Kate

Ingredients
  • 6 Tablespoons unsalted butter
  • 1 cup coarse grind cornmeal
  • 1 1/4 cup white whole wheat flour or regular whole wheat flour
  • 1/2 tablespoon kosher salt
  • 1 teaspoons baking powder
  • 1/4 teaspoon baking soda
  • dash cinnamon
  • 1 cup buttermilk, at room temperature
  • 2 large eggs, at room temperature
  • 1/4 cup maple syrup
  • 1 1/2 cup frozen corn
Instructions
  1. Heat the oven to 375 degrees Fahrenheit with a rack in the middle of the oven. Place the stick of butter in a 10 to 12-inch cast iron skillet or 9-inch square baking dish and place in the oven to melt for 5 to 10 minutes.
  2. In a large bowl, whisk together the cornmeal, flour, salt, baking powder, baking soda and cinnamon. In a medium bowl, whisk together the milk, eggs and syrup until smooth. Stir the wet ingredients into the dry ingredients until moistened through.
  3. When the butter is melted and golden brown but not burnt, carefully remove the sizzling skillet from the oven and swirl to coat with butter. Pour the melted butter into the batter, add the cranberries and stir just until incorporated.
  4. Pour the batter into the hot skillet or baking pan. Return the skillet to the oven and bake until the bread is brown around the edges, springy to the touch and a toothpick inserted in the center comes out clean with just a few crumbs, 25 to 35 minutes. Invert the bread onto a wire rack to cool. Slice into squares or wedges and serve.

#BreadBakers is a group of bread loving bakers who get together once a month to bake bread with a common ingredient or theme.  Follow our Pinterest board right here. Links are also updated each month on this home page.

We take turns hosting each month and choosing the theme/ingredient.

If you are a food blogger and would like to join us, just send Stacy an email with your blog URL to foodlustpeoplelove@gmail.com.

Here is what everyone came up with for a new take on the Thanksgiving traditional breads:

Brown Butter Sage Biscuits by Sophia at Sweet Cinnamon & Honey
Butterflake Rolls by Anshie at Spiceroots
Buttermilk Rolls by Renee at Magnolia Days
Cast Iron Parker House Rolls by Veronica at My Catholic Kitchen
Cheese & Mustard Pull Apart Bread by Laura at Baking in Pyjamas
Classic Anise Dinner Rolls by Kathya at Basic N Delicious 
Crusty French Bread Rolls by Robin at A Shaggy Dough Story
Gruyere Gourgeres by Nicole at The 2nd 35 Years
No Knead Dinner Rolls by Heather at Hezzi-D's Books and Cooks
Parker House Rolls by Tara at Noshing With The Nolands
Parmesan Garlic Knots by Lauren at From Gate to Plate 
Pumpkin and Rosemary Bread by Rocio at Kidsandchic
Pumpkin Pani Popo by Kelly at Passion Kneaded
Pumpkin, Sage & Cheddar Pull Apart Rolls by Mireilee at Chef Mireille's East West Realm Overnight Rosemary Rolls by Holly at A Baker’s House
Skillet Cornbread by Sandra at Meadows Cooks
Soft and Tender Dinner Rolls by Stacy at Food Lust People Love
Sourdough Cornbread Rolls with Sage by Karen at Karen's Kitchen Stories
Sweet Potato Rolls by Cindy at Cindy's Recipes and Writings 
Tomato Herb Loaves by Camilla at Culinary Adventures with Camilla
Zopf bread by Carola at En la Cocina de Caro 
 

Tuesday, July 22, 2014

tomato basil frittata with homemade wheat berry bread


There is nothing like growing your own food. So satisfying. Not just because you see it grow from seeds, to flowers, to fruit which then ripen, but because you know exactly what went into it. Why? Because you were there from the start.

That may be why this frittata was the best I've tasted in a long time. That and the 1/2 cup of grated romano melted on top.

Tomato Basil Frittata
Makes one 8-inch frittata, adapted from Mark Bittman's How to Cook Everything Cook Book

Ingredients
    • 2 tablespoons canola oil
    • 1/2 onion, chopped
    • Salt and fresh ground pepper
    • 2 medium-small tomatoes (1 1/2 cups), chopped
    • 5-8 basil leaves, sliced
    • 7 eggs
    • 1/2 cup grated Romano cheese
    Instructions
    1. Heat oil in 8-inch skillet. When hot add onion, salt and pepper and cook until soft. Add tomato and lower heat. Cook until dry and reduced. Add basil and stir to combine.
    2. Meanwhile whisk eggs with salt and pepper. Pour eggs into the pan and smooth over vegetables to cover. Add cheese.
    3. Cook undisturbed until mostly firm. To complete setting the eggs place in oven at 350F for 5 minutes.
    Wheat berry Bread
    Makes two loaves, adapted from Bread Alone Cook Book
    (Bread takes two days to complete - one for the starter and the next for the bread. The starter doesn't take much time to prep, but day two of making bread requires at least 5 hours - I sometimes let the bread ferment over night, if my schedule doesn't allow for making the bread all in one day, and that seems to be okay.)

    Poolish (Starter) Ingredients
    • 3/4 cup spring water
    • 1/2 teaspoon dry yeast
    • 1/2 cup all-purpose flour
    • 3/4 cup white whole wheat flour
    Final Dough Ingredients
    • 2 1/4 cup spring water
    • 1/2 teaspoon dry yeast
    • 2 3/4 cup white whole wheat flour
    • 1 tablespoon salt
    • 3 14/ - 4 1/4 white whole wheat flour
    • 1 cup whole wheat berries
    Instructions: Day One
    1. Place wheat berries in a medium bowl and cover with spring water. Let sit over night.
    2. Combine water and yeast of poolish. Let stand a minute and then mix to dissolve.
    3. Add poolish flours and stir with a wooden spoon for about 100 strokes. You know you are done when the gluten strands come off the spoon when pressed to the side of the bowl.
    4. Cover with plastic wrap and a dish towel (to keep it dark) and leave over night in a relatively warm place. I use the stove top.
     Instructions: Day Two
    1. Poolish should be bubbly, soupy, and puffy with a wheaty aroma. Place poolish in a large bowl and add final dough water and yeast. Mix to break up the poolish making a uniform consistency.
    2. Add the first amount of flour and drained wheat berries. Stir until combined. Add salt and enough of the rest of the flour to make a thick mass of dough that doesn't stir easily. Turn out onto a floured surface and knead for 15-17 minutes, adding flour as needed. Dough is ready when a small amount pulled away bounces back.
    3. Shape the dough into a ball and cover with oil, turning it in the bowl to cover all the sides. Cover the bowl with plastic wrap and a dish towel and place in a warm spot for fermentation, until doubled in volume, about 2-3 hours. Dough is ready when you push your finger in and it leaves a dent.
    4. Deflate the dough by pushing in the center and pulling up on the sides. Place on a floured surface and cut into two equal pieces. Gently flatten each piece with the palm of your hand, pressing the bubbles out. Shape each piece into balls. Place loaves on a wooden surface and cover with a damp, clean dish towel until doubled in size, about 2 hours.
    5. Heat oven to 450F one hour before you are going to bake. Oven rack should be in the middle of oven.
    6. Carefully place loaves onto a baking sheet, one at a time - I used a pizza pan - trying not to deflate them too much.
    7. Place in oven and spray inside with water to create steam. Quickly close the oven to capture the steam and bake for 3 minutes. Repeat the water spray and bake for another 15-20 minutes. Lower temperature to 400 and bake for another 15-20 minutes, until the bread is golden brown. You can tell if it is done by patting its bottom. If it sounds hollow it is done.

    Tuesday, June 3, 2014

    honey brioche loaf


    So bread making has finally entered the realm of recipes I can make from memory. I love that!

    I was upstate without my handy Bread Alone Cookbook and was able to duplicate the baguette recipe all the way through.

    This brioche is a bit different but all the essential parts are the same. You've got your poolish (or starter), which is a very wet version of the final product and can be made the day before and left to rise and fall to its heart's content.

    Then you add the same elements, only more of them, to make the dough. This gets kneaded and left in a bowl for hours. Then the dough is divided and left to ride for a couple of more hours. Then the divided dough is placed in its final state (in this case in the loaf pans) to rise another couple of hours.

    Then you bake.

    Couldn't be simpler.

    Honey Brioche Loaf
    Makes two 8 inch loaves, adapted from Bread Alone Cookbook

    Poolish Ingredients
    • 1 cup milk
    • 2 tablespoons honey
    • 1-1/2 teaspoon dry yeast
    • 1-1/2 cup all-purpose flour
    Bread Ingredients
    • 1/4 cup honey
    • 2 eggs
    • 2-1/2 cup all-purpose flour
    • 8 tablespoons unsalted butter, cut into 8 pieces
    Instructions
    1. Combine polish ingredients together in a large bowl. Mix with a wooden spoon for 2 minutes until smooth and stretchy/sticky. Leave in bowl. Cover with plastic wrap and a towel. Place in a warm, draft-free area of kitchen. Leave to rise for 2-24 hours.
    2. Add all bread ingredients but the butter to the poolish. Mix in butter chunks until smooth and stretchy. Round into a ball. Clean out bowl and coat with butter. Replace bread into bowl and leave to rise for 4-8 hours.
    3. Collapse bread by flouring generously on top and pushing the center in while pulling the outer edges up. Generously flour a surface and knead the bread on it, adding flour as needed. Ending with a slightly sticky, smooth dough. Half the dough and make each piece into an 8-inch rope. Place each rope in an 8-inch buttered loaf pan with smooth side up. Cover with plastic wrap and a towel for 2 hours, or until dough rises above the lip of the pan.
    4. One hour prior to baking, place oven shelf in the middle of oven and pre-heat oven to 400F. Bake loaves for 20-30 minutes, or until evenly browned. Remove and let cool on rack.

    Monday, June 2, 2014

    honey-goat cheese popovers


    I've made popovers by starting with a cold oven, and now I've made them by starting with a hot pan. The results are the same. Both times they pseudo-popped over. What can I say. Maybe it is my oven.

    In any case they always taste amazing. Something about eggy batter straight from the oven always works for me. And this time, with honey-goat cheese thrown in the midst, they are so delicious you cannot resist one or five.

    Even though the recipe state: Serve Immediately, I brought these to a party and they went over well. The savory sweetness holds up over time.


    Honey-Goat Cheese Popovers
    Makes 12, from Eats Well With Others

    Ingredients
    • 3 large eggs, room temperature
    • 1 1/2 cups 2% milk, room temperature
    • 1 1/2 cups white whole wheat flour
    • 1 1/4 tsp salt
    • 1 1/4 tsp freshly ground black pepper
    • 4 oz goat cheese, room temperature
    • 2 tbsp honey
    Instructions
    1. Preheat oven to 450F, with an oven rack in the lower third of the oven. Preheat a muffin tin in the oven while you prepare the batter.
    2. In a large bowl, whisk together the eggs and milk. Whisk for a minute so that the mixture becomes frothy.
    3. Sprinkle the flour, salt, and black pepper over the top. Whisk until well combined. There may be some small lumps remaining.
    4. In a small bowl, mix together the goat cheese and honey.
    5. Remove the muffin tin from the oven and spray with cooking spray. Divide the batter among the cups, filling them about 3/4 full. Drop about a tsp of goat cheese into the center of each cup, dividing it evenly.
    6. Bake popovers for 15 minutes at 450F. Lower heat to 350F and bake for another 15-20 minutes more, until puffed up and browned all over. Immediately turn out onto a wire rack when done. Serve immediately.

    Wednesday, May 28, 2014

    papaya muffins


    Yes, we had no bananas... but we did have a papaya.

    I know, weird. But... truth is often stranger than fiction.
    So, what do papaya muffins taste like?
    Well, they don't exactly taste like papaya. But they are sweet and moist and with an addition of chocolate chip how could they go wrong.
    No, really, they were pretty good.

    Papaya Muffins
    Makes 12 muffins, adapted from Mark Bittman's How to Cook Everything Cookbook

    Ingredients
    • 2 cups all purpose flour1/2 teaspoon salt
    • 3 teaspoons baking powder
    • 3 tablespoons melted unsalted butter
    • 1/4 cup maple syrup
    • 1 egg, beaten
    • 1 cup fresh papaya, mashed
    • 1/4 cup milk
    • 1 cup chocolate chips
    Instructions
    1. Heat oven to 375 F. Grease 12 muffin tins with oil or butter.
    2. Mix all dry ingredients in a large bowl. Mix all wet ingredients

      in a medium bowl. Form a well in the center of the dry ingredients and pour the wet ingredients into it. Mix everything together until just combined. Mix in chocolate chips.
    3. Distribute evenly into muffin tins. Bake for 20 minutes or until a toothpick comes out cleanly.

    Tuesday, April 29, 2014

    boiled soft pretzels


    Sometimes something is not broken and I still try to fix it. I am guessing I am not the only one, as evident by the existence of the adage.

    Call it curiosity. Call it restlessness. Call it forgetfulness. And sometimes, call it fortuity.

    I made some soft baked pretzels a while ago and they were absolutely perfect. I mean, I could not tell them form the real deal you buy on the street at major tourist locations around NYC.

    I was having a craving for them this weekend and instead of going to my blog and remaking the recipe I loved so much I looked through the vast amount of recipe print outs that litter my kitchen (much to my husband's chagrin) and came up with this one.

    My husband proclaimed this recipe even better than the last. I found them sweeter with a more resistant chew. I will have to make the first ones again to be sure of the winner. Make them and you can be the judge too.

    Boiled Soft Pretzels
    Makes 8 pretzels, minutely adapted from The Kitchn

    Ingredients
    • 1 cup room temperature spring water
    • 2 teaspoons active dry yeast
    • 2 1/2 to 3 cups all-purpose flour
    • 1 tablespoon sugar
    • 1 1/2 teaspoons salt
    • 1/4 cup baking soda
    • 1 tablespoon barley malt syrup, rice syrup, or dark brown sugar
    • 1 large egg, whisked with 2 tablespoons warm water
    • Coarse sea salt or pretzel salt 
    Instructions
    1. Combine the spring water and yeast in a medium bowl. Let stand a few minutes, then stir to dissolve the yeast. Add 2 1/2 cups of the flour, sugar, and salt. Stir with a stiff spatula to form a floury, shaggy dough.
    2. Knead the dough in the bowl for 5 to 7 minutes. If it is very sticky, add the extra flour but try and work it without the extra. The dough has finished kneading when it is soft, slightly tacky, and holds a ball.
    3. Clean out the bowl, film it with oil, and return the dough to the bowl. Cover and let rise somewhere warm until the dough is doubled in bulk, about 1-2 hour, but you can leave it for more time.
    4. Turn the dough out onto a lightly floured work surface. Divide the dough into 8 equal pieces.
    5. Working with one piece of dough a time, roll the dough into a long, skinny snake against the counter using the palms of your hands or between you palms. Aim for a rope about 20 inches long. If it shrinks back on you, set it aside, roll another piece of dough, and come back to it after it's rested a few minutes. Lift the ends of the rope toward the top of your work surface and cross them. Cross them one more time to make a twist, then fold the twist back down over the bottom loop to form a pretzel shape.
    6.  Set the pretzel on a parchment-lined baking sheet and continue shaping the rest of the pretzels. When all the pretzels are shaped, cover them loosely with a cloth and set them aside to rise until puffy, 20 to 30 minutes.
    7. Preheat the oven to 450°F. Place a rack in the middle-bottom position.
    8. When the pretzels are starting to look puffy, measure 8 cups of water into a large, wide pot and set over high heat. Make sure the pot has high sides because the water will foam, nearly doubling in volume, when you add the baking soda. Bring the water to a rapid simmer, then add the baking soda and the barley malt syrup (I used regular raw sugar). The baking soda will make the water foam up the sides of the pot. Stir to dissolve the baking soda and syrup, then reduce the heat to medium to maintain a simmer.
    9. Lower pretzels into the water bath — as many as will fit without crowding (I could only manage one at a time - I am not sure why they need to be done in pairs). Simmer for 30 seconds, then use a slotted spoon to flip the pretzels over. Simmer for another 30 seconds, then scoop the pretzels out of the water and return them to the baking sheet. While in the water bath, the pretzels will puff and take on a doughy, puckered appearance. Repeat with the remaining pretzels.
    10. Place pretzels on parchment or silpat lines baking sheet. Brush the pretzels with the egg and water mixture and sprinkle them with salt.
    11. Bake the pretzels until they are deep brown and glossy, 12 to 15 minutes.
    12. Transfer the pretzels to a cooling rack and let sit until cool enough to handle. Pretzels are best when eaten fresh and hot, but will still be good for up to a day later. Store them in a paper bag at room temperature. Do not store them in a plastic container, they will get soggy and the salt will dissolve - see photo).

    Friday, April 18, 2014

    hot cross buns


    My family is really bad at keeping traditions.

    Birthdays pass forgotten, anniversaries are barely ever mentioned, even Christmas is almost a wink of the eye.

    So it is nothing short of a miracle that I am posting Hot Cross Buns on Good Friday, the day they are traditionally eaten. Must be my son's Catholic school rubbing off.

    And I am so glad I did. These little buns are so heavenly! How did I live a whole life and never have any? Such a shame.

    I plan to make up for the loss by eating the entire tray of them solo (just kidding - I am having some willing helpers) and making this a family tradition - Hot Cross Buns every Good Friday, and maybe some bad Fridays, too.

    Hot Cross Buns
    Makes 18-22 buns, adapted from Tasty Kitchen

     Ingredients
    • 1 cup milk
    • 1/4 cups canola oil
    • 1/4 cups sugar
    • 1/2 package (1 1/8 teaspoons) active dry yeast
    • 2 cups all-purpose flour
    • 1/4 cups (additional) flour
    • 1/4 teaspoons baking powder
    • 1/4 teaspoons baking soda
    • 1 teaspoons salt
    • 1/4 cups sugar
    • 1 teaspoon cinnamon
    • Spices: cardamom, nutmeg, allspice (optional)
    • ½ cups mixed dried berries and pepitas (any dried berries will do)
    • 1 egg white
    • Splash of milk
    Icing Ingredients
    • 1 egg white
    • Powdered sugar
    • Splash of milk
    Instructions

    1. Combine 1 cup milk, canola oil, and 1/4 cup sugar in a saucepan. Stir and heat until very warm but not boiling. Turn off the heat and allow to cool until mixture is still warm, but not hot–about 30 minutes. Sprinkle yeast over mixture.
    2. Add 4 cups of flour and stir to combine. Mixture will be very sticky. Cover with a towel and set aside for 1 hour.Add 1/2 cup flour, baking powder, baking soda, and salt. Stir till combined.
    3. Combine 1/4 cup sugar with cinnamon and whatever other spices you want to use. Lightly flour surface. Press to slightly flatten dough.
    4. Sprinkle a couple tablespoons of the sugar/cinnamon mixture. Sprinkle on about a third of the berries. Then fold the dough over on itself and flatten again so the berries and spices are not visible. Repeat the sugar/berry process, then fold the dough again. Repeat a third time until all the berries are used. (You won’t use all the sugar/cinnamon mixture.)
    5. Pinch off ping pong or golf ball-size bunches of dough. With floured hands, quickly roll it into a ball, then turn the edges under themselves slightly to create nice rounded balls. Place on a parchment covered cookie sheet. Cover and allow to rise in a warm place for at least 30 minutes to an hour or more until balls have risen twice their size. Once risen you can cut a cross into the tops with a small serrated knife. I didn't have much luck with this - the knife I have is not deal and the little buns deflated, so I only did half of them this way.
    6. Meanwhile preheat oven to 400 degrees
    7. Mix the glaze by combining one egg white with a splash of milk. Brush onto each roll.
      Bake for 20 minutes, give or take, or until tops of buns have turned nice and golden brown. Remove from pan and allow to cool completely on a cooling rack.
       
    8. You can eat these without the icing - they are that good - but for the traditional recipe add the icing crosses. Mix the icing by combining one egg white with enough sifted powdered sugar for icing to be very thick. (I didn't add enough sugar for a very thick icing, but it was alright, although a bit runny.) Splash in milk as needed for consistency.
    9. Add icing to a small Ziploc bag and snip the corner. Make icing crosses on each roll, making sure they’re completely cooled first. Happy Easter!


    Wednesday, April 16, 2014

    peanut butter banana bread


    Well, wasn't expecting snow this morning, that's for sure. Were you?

    I've never been very good at checking the weather. I am always the one without an umbrella when it is pouring. Or the one who is wearing shear stocking and a skirt when it is snowing. You'd think I'd learn!

    This banana bread will warming you up on those unexpected snow shower days. Or cool you down when it is 80 and you're in your parka. It works both ways. Like magic!

    Peanut Butter Banana Bread
    Makes on 5x9 inch loaf, adapted from Joy the Baker
     
    Ingredients
    • 2 mashed ripe bananas
    • 1/3 cup plain Greek
    • 1/3 cup chunky all-natural peanut butter
    • 3 tablespoons butter, melted
    • 2 large eggs
    • 3/4 cup granulated sugar
    • 2 tablespoons molasses
    • 1 cup whole wheat flour
    • 1/2 cup all-purpose flour
    • 1/4 cup ground flaxseed meal
    • 3/4 teaspoon baking soda
    • 1/2 teaspoon salt
    • 1/2 teaspoon ground cinnamon
    • 1/8 teaspoon ground allspice
    • 1 tablespoon rum
    • 1 cup semi-sweet chocolate chips
    Instructions
    1. Place a rack in the center of the oven and preheat to 350 degrees F.  Grease and flour a 9×5-inch loaf pan.  Set aside.
    2. In a large bowl, whisk together flours, flaxseed meal, baking soda, salt, ground cinnamon and ground allspice.
    3. In a medium bowl, whisk together  mashed bananas, yogurt, peanut butter, rum and melted butter.  Whisk in eggs and sugars.  Blend mixture until no sugar lumps remain.
    4. Pour the wet mixture into the larger bowl with the dry ingredients.  Fold together with a spatula until no more flour bits remain.  Fold in the chocolate chips as well.  Pour the batter into the prepared baking pan and cake for 55 to 65 minutes, or until a skewer inserted into the center of the loaf comes out clean.
    5. Remove from the oven and allow to cool in the pan for 20 minutes before running a butter knife along the edges of the pan and inverting the bread onto a wire rack to cool completely.
    6. This bread lasts, well wrapped at room temperature,for up to 4 days.  It is also great to store, well wrapped, in the freezer. 


    Friday, March 28, 2014

    soft baked whole wheat pretzels


    Speaking of Spring... these pretzels bring to mind baseball games and picnics in the park. They are so amazingly exactly the real deal - the ones you get from the hotdog man on a warm sunny day. Can't believe how easy it was to duplicate one of my favorite treats.

    Soft Baked Whole Wheat Pretzels
    Makes 12-16 pretzels. From Sally's Baking Addiction

    Ingredients
    • 1 and 1/2 cups lukewarm warm water
    • 1 packet active instant yeast (2 and 1/4 teaspoons)
    • 1 teaspoon salt
    • 1 Tablespoon granulated sugar
    • 3.75 - 4.25 cups all-purpose flour + whole wheat flour mixed
    • 1-2 large egg, beaten
    • course sea salt for sprinkling
    Instructions
    1. Preheat oven to 425F degrees. Line baking sheet with parchment paper or silicone baking mat. Set aside.
    2. Dissolve yeast in warm water. Stir with a spoon until fairly mixed, about 1 minute. Some clusters of yeast will remain. Add salt and sugar; stir until fairly combined. Slowly add 3 cups of flour, 1 cup at a time. Mix with a wooden spoon until dough is thick. Add 3/4 cup more flour until the dough is no longer sticky. If it is still sticky, add up to 1/2 cup more. Poke the dough with your finger - if it bounces back, it is ready to knead.
    3. Turn the dough out onto a floured surface. Knead the dough for about 3 minutes and shape into a ball. With a sharp knife, cut ball of dough into 1/3 cup sections. This measurement does not have to be exact - use as much or little dough for each pretzel as you wish - the size of the pretzel is completely up to you.
    4. Roll the dough into a rope with an even diameter. This measurement will depend how large you want the pretzels. Once you have your long rope, take the ends and draw them together so the dough forms a circle. Twist the ends, then bring them towards yourself and press them down into a pretzel shape.
    5. In a small bowl, beat the egg and pour into a shallow bowl or pie dish. Dunk the shaped pretzel into the egg wash (both sides). Place on baking sheet and sprinkle with salt.
    6. Bake for 10 minutes at 425F degrees.
    7. Allow to cool and enjoy. Serve warm or at room temperature. Pretzels may be stored in an airtight container or ziplock bag for up to 3 days (will lose softness). Pretzels freeze well.

    Tuesday, March 18, 2014

    healthy hearth bread


    I know that I am inundating you with bread, but I am just so excited about my new found 'talent'. Most of the credit goes to Bread Alone. Their bread cookbook is amazing. And a lot of the credit goes to poolish.

    Poolish is the pre-bread you make before you are ready to make the real bread. It is a watered down version of the final product, consisting of spring water, yeast and flour.


    This is poolish right after it has been mixed together. It resembles a thick gummy gruel.


    Leave it covered for 2-24 hours and it bubbles up to fill the bowl (this was after only 2 hours of waiting). It now resembles flubber - both sticky and resilient at the same time.

    You use the poolish as a starter, to which you add more spring water and yeast, and then lots more flour with a little salt added in, until you have enough flour to make a nice dough.

    Another nice trick I learned in Bread Alone's cookbook is once you have your lovely loaf of bread out of the oven and have had as much warm slices slathered with salty butter that you can stand to eat, you shouldn't store it in plastic, nor in the fridge. All you need to do to keep it remaining fresh is leave the loaf cut side down on a wooden cutting board. I know, sounds dubious, right? I expected to have a rock hard loaf on my hands after a night left like this... but it worked! The cut side was not dried out and the whole loaf was still crunchy on the outside and soft and chewy on the inside. Perfect. It lasts like this for three days.


    Monday, March 17, 2014

    avocado & lox & capers


    Good morning.

    This weekend was super exciting. A friend had her second baby and I was able to visit her 8 hours after he arrived. It reminded me of when I had my own son: being in the hospital with this new creature, so strange and new. Learning how to exist with a little, helpless animal, learning the personality of this addition to the family. Made me nostalgic.

    Here is a simple treat - have it for breakfast, have it for lunch, eat it whenever you like.
    Avocado & Lox & Capers
    Serves 1

    Ingredients
    • 1 bagel
    • 1 avocado
    • some lox (as much or as little as you like
    • some capers
    Assemble. Enjoy. 


    Wednesday, March 12, 2014

    bread alone's french baguettes {recipe review}


    For a novice this is just flat out amazing. On my first try I made four beautiful French baguettes. Is this unprecedented? Have I won a world's record, or something?

    I owe it all to the cookbook by Bread Alone. I bought it on a whim, figuring I love their bread and should have the best teacher when attempting something as daunting as baguettes. Then, as with most of my recipe books, it sat on the shelf for years.

    With pizza dough under my belt I started to think that I may have a chance at a real loaf of bread, complete with poolish (I had no idea what that was) and seven steps, taking two days to complete. I confess I did not hold fast to the entire recipe - there are many steps all of which require specific time frames to complete. My schedule just does not allow for this kind of precision.

    But, even with all my altering of time left to rest, and not taking the temperature of the bread, the oven, the room, I ended up with four fabulous loaves. So even if you don't follow it to the letter this recipe comes through.

    And then you have fresh baked bread to share with your honey... and your sweetie too.

    Friday, March 7, 2014

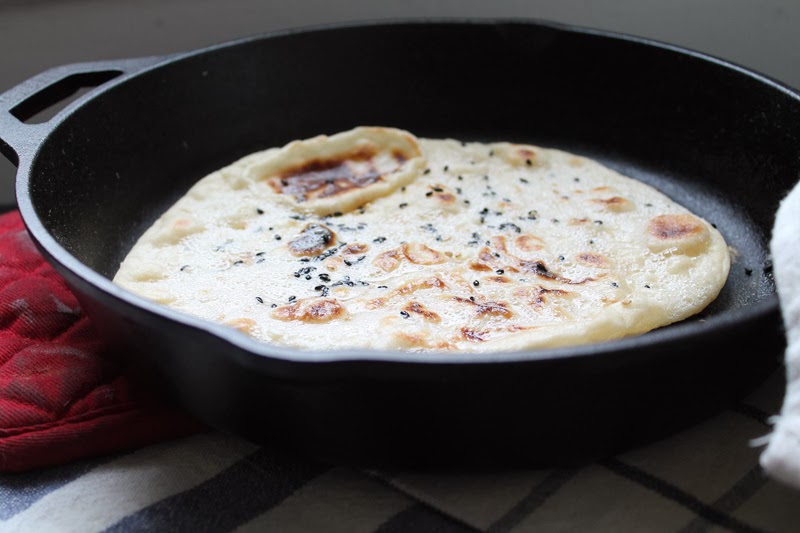
    skillet naan


    People say your life changes when you have a child. This sounds plausible, even likely, until it happens and you realize that YOUR LIFE WILL NEVER BE THE SAME.

    Not a bad thing, but something to mull over.

    No more eating brownies/pop corn/potato chips/fill in the blank for dinner.
    No more horror/sci fi/period piece/fill in the blank movie binges well into the night.
    No more reading a book/knitting/cooking/fill in the blank in peace.

    Basically, no more being your own person.You will now be a person for another person.

    Oh, I know, some parents are good at keeping boundaries. Their kids go to bed in the early evening and they have the rest of the night to themselves. They have nannies and day care and by necessity largely do not see their kids all that much. We haven't managed this somehow. Lack of conviction? Maybe. Lack of will power? Probably. Lack of resolution? Definitely.

    But however hard it is to do my own thing, I have realized that doing for someone else may be more important, in the end. And the kid'll grow up... eventually.

    Skillet Naan
    Makes 6 naans, adapted from Manjula's Kitchen recipe

    Ingredients
    • 2 cups of All Purpose flour, plus more for rolling
    • 1 teaspoon active dry yeast
    • 1 teaspoon salt
    • 1 teaspoon granulated sugar
    • Pinch of baking soda
    • 2 tablespoons of oil
    • 3 tablespoons yogurt
    • 2/3 cup lukewarm water
    • Mix-ins: cumin seeds, fresh garlic, sesame seeds
    • Melted butter
    • Coarse sea salt for finishing
    Instructions
    1. In a large bowl whisk together the flour, yeast, salt, sugar, and baking soda. Add the oil and yogurt and mix with your hands until a crumbly dough is formed. Add enough water to make a soft dough that's not sticky. Knead dough until smooth and satiny, about 3-5 minutes. Cover with plastic and an opaque cloth in a warm place to rise until twice its volume, about 2-4 hours.
    2. Knead the dough for 2 minutes and divide into 6 balls. Cover again with plastic and a cloth and let rest for 20 minutes.
    3. Take each piece of dough, one at a time, and roll into an 8-inch circle. Sprinkle mix-in, if using and roll over them to incorporate. (I found that much of the mix-ins fell off in the pan. You can omit this step and sprinkle them on after the butter which makes them stick better)
    4. Warm a large cast iron skillet over high flame until it's nearly smoking. Gently lay the dough in the hot skillet. The dough will start to bubble after a minute. It should be blistered. 
    5. Flip the dough. Cook for about 30 seconds more. If the dough doesn't bubble and brown in 90 minutes the skillet may not be hot enough or the dough may be too thick.
    6. Remove the naan from the skillet, brush with melted butter and sprinkle with coarse sea salt.

    Tuesday, February 18, 2014

    100% whole wheat rolls


    The hubris that success lends gives rise to foolish choices. Having had such great success with the last whole wheat roll recipe, I decided I was ready to go whole hog - and eliminate white flour all together. Oh how silly we can be... it was a miserable failure.

    Let me tell you why.

    I didn't make sure the yeast was frothy. Yes, it is that simple. Being a novice at bread making and all of its twists and turns, I was not sure what frothy looked like in a yeast. But now I realize, if you are not sure, then it is not frothy enough. It should be gangbusters frothy. Especially when only using whole wheat, not yeast's first choice for a meal, apparently.

    So, how did I make sure this time?

    I added some sugar. You see, yeast just loves sugar. It foams right up for just a teaspoon. Even with all this care taken to the yeast, this recipe ended up a bit dry and crumbly, although not sweet at all, which I was glad of, since there is some sugar in there. It was not at all like my last whole wheat roll recipe.

    Moral of the story? Either you can't have a perfect roll AND have it be entirely whole wheat... or I just have not discovered the secret. I'll let you know if I do.

    100% Whole Wheat Rolls
    Adapted from An Oregon Cottage
    Makes 12 rolls

    Ingredients
    • 2 teaspoons dry yeast
    • 1/4 cup warm water
    • 1 teaspoon sugar
    • 1/4 cup vegan butter
    • 1/8 cup honey
    • 1 egg
    • 1/2 cup soy milk (or other milk)
    • 3 cups whole wheat flour
    • 1/2 teaspoon salt
    • Olive oil
    Instructions
    1. Dissolve yeast and sugar in water in a glass bowl. Set aside.
    2. Cream butter and honey. Add egg and mix. Add milk and yeast mixture.
    3. Add 2 cups flour and salt, mixing until combined. Knead for 2-3 minutes, until no longer tacky, adding flour to aid in this.
    4. Make a ball with the dough and cover in oil. Place in an oiled bowl. Cover with plastic and a towel and let rest in a warm place for 1-2 hours, until increased to twice its size.
    5. Turn out on a floured surface and knead a couple of time. Let rest 3 minutes. 
    6. Divide into 12 balls. Flatten each ball and roll so ends are tucked under. Place balls in a greased 9 inch pie tin or other oven safe pan. Cover with plastic and a towel and let sit for 1-2 hours, or until doubled in size.
    7. Heat oven to 350F. Bake rolls for 20-25 minutes, until golden brown.

    Tuesday, February 11, 2014

    healthy molasses oat breakfast rolls


    I have discovered the new best breakfast. One that doesn't need to be mixed and fried while hungry certain somebodies are (im)patiently awaiting their meal.

    While it does take a little time management to make them, once done they are ready to go at moments notice. Just pull off a sweet morsel and you're on your way. They can be eaten on the go (out the door) or leisurely with tea and honey (my favorite).

    Healthy Molasses Oat Breakfast Rolls
    Adapted from the Kitchn
    Serves 8-12
    • 2 teaspoons active dry yeast
    • 1 tablespoon sugar
    • 1/4 cup lukewarm water
    • 3/4 cups milk
    • 3/4 cups rolled oats
    • 1/2 cup vegan butter cut into cubes
    • 3 tablespoons molasses
    • 2 teaspoons salt
    • 1 egg
    • 2 1/2-3 cups flour (unbleached all-purpose or bread flour)
    • 2-3 tablespoons oil for brushing tops of rolls
    1. Dissolve yeast in 1/4 cup lukewarm water with a pinch of sugar. Let stand until bubbly. If it doesn’t get bubbly, throw it out and get some new yeast.
    2. Scald milk then add it to the butter in your mixing bowl. When butter has melted, add brown sugar, rolled oats, molasses, and salt. Blend thoroughly and cool to lukewarm.
    3. Add egg and mix well. Add the yeast and mix to incorporate it. Then mix in 2 ½ cups of the flour. Add what you need to of the remaining ½ cup of flour until the dough loses its sheen. Let rest for 10 minutes.
    4. Scrape the dough out of the mixing bowl and put it in a greased bowl. Turn to coat and cover with plastic wrap and refrigerate for a minimum of two hours (I left it over night for two nights - that's how my schedule goes). It doesn't rise a lot.
    5. Turn out the chilled dough on a floured work surface and knead or fold and turn the dough slightly. Cut dough into 12 balls. Press each ball into a flat rectangle with your fingers, then roll up and tuck ends under. Place seam-side down in a well-buttered 9 inch round pan. Brush all over with oil and sprinkle with a little of the rolled oats. Let rise until doubled in size in a warm place, one to two hours.
    6. Preheat oven to 350° F. Bake for 35-40 minutes or until rolls are nicely browned and sound hollow when you tap their tops. The internal temperature should be 190 degrees. Remove from the pans and brush generously with remaining oil. Let cool on a rack for 5-10 minutes. 
    7. Serve with a generous spread of vegan butter or cream cheese, and honey.


    Monday, January 6, 2014

    spicy black bean soup & salt and pepper biscuits

    My son took his Gifted & Talented test on Sunday. The source of much anxiety for parents of the four-year-old set, this test is used to decide which children are allowed entrance into coveted, free school programs around the city.

    The test is graded by percentile of the population taking the test. So, if your child gets a grade of 97%, they have gotten more questions right than 97% of the children who took the same test. To get 97% is to be offered a space in the few schools which have only children who have scored that high. To get 90% is to be offered a space in a G&T class, which resides in a school with general education classes.

    Many people pay upwards of $2000 for preparation classes, getting their three and four year olds ready for the test. Some people do not prepare their kids for the test at all. We took the middle route. About two months ago we bought the sample test booklets and periodically had our son practice them. At the very least he would be familiar with how the questions were asked and what kind of questions to expect.

    Half way into my son's test, my husband and I, along with many other parents, were waiting in the cafeteria where the test was being given, a woman came in and asked to speak with us. My son was refusing to finish the test. She wondered if we would mind trying to talk him into finishing...

    ...to be continued.

    This soup and these biscuits compliment each other like you wouldn't believe. The soup was not all that spicy so if you really like the heat I'd add some more red pepper flakes or some cayenne pepper. Try it - it's just what the doctor ordered on this cold winter nights.
     
    Salt and Pepper Biscuits
    Adapted from Joanne at Eats Well with Others
    Yield: 8-10 biscuits
    Ingredients:
    • 3/4 cup full fat yogurt
    • 4 tablespoons heavy cream, divided
    • 1 tablespoon baking powder
    • 1 teaspoon kosher salt
    • 1 teaspoon sugar
    • 1/2 teaspoon coarsely ground black pepper, plus more for sprinkling
    • 1 cup all purpose flour
    • 1 cup whole wheat flour
    • 6 tablespoons chilled unsalted butter, cut into small pieces
    • flaky sea salt
    Instructions
    1. Preheat oven to 425. In a small bowl, whisk together the Greek yogurt and 3 tbsp of the heavy cream. Set aside.
    2. In the bowl of a food processor, combine the baking powder, salt, sugar, black pepper, and flours. Pulse together until combined.
    3. Add the chilled butter to the bowl and pulse until the butter is broken down into pea-sized chunks. Transfer the mixture to a large bowl and gently stir in the yogurt/cream mixture. Knead until it turns into a ragged dough. Roll out the dough on a lightly floured work surface until it is about 3/4"-inch thick. Using a biscuit cutter, cut out the biscuits, re-rolling the scraps as needed.
    4. Place the biscuits on a parchment-lined baking sheet and brush with the remaining heavy cream. Sprinkle with sea salt and black pepper. Bake until golden brown on the tops and bottoms, about 15-20 minutes. Serve warm.

    Spicy Black Bean Soup
    From Cookie and Kate

    Ingredients:
    2 tablespoons olive oil
    • 2 medium yellow onions, chopped
    • 3 celery ribs, chopped fine
    • 1 large carrot, peeled and sliced into thin rounds
    • 6 garlic cloves, pressed or minced
    • 4½ teaspoons ground cumin
    • ½ teaspoon red pepper flakes
    • 4 (15-ounce) cans of black beans, rinsed and drained
    • 4 cups low-sodium vegetable broth
    • ¼ cup chopped fresh cilantro (optional)
    • 1 to 2 tablespoons sherry vinegar, to taste, or 2 tablespoons fresh lime juice
    • Sea salt and freshly ground black pepper, to taste
    • Optional garnishes: diced avocado, extra cilantro, thinly sliced radishes, tortilla chips…
    Instructions
    1. Heat the olive oil in a large Dutch oven over medium heat until shimmering. Add the onions, celery and carrot and a light sprinkle of salt. Cook, stirring occasionally, until the vegetable are soft, about 10 to 15 minutes.
    2. Stir in the garlic, cumin and red pepper flakes and cook until fragrant, about 30 seconds. Pour in the beans and broth and bring to a simmer. Cook until the broth is flavorful and the beans are very tender, about 30 minutes.
    3. Puree about 4 cups of the soup in a blender until smooth (beware the steam that escapes from the top of the blender, it’s very hot). Return the pureed soup to the pot, stir in the cilantro, vinegar/lime juice and salt and pepper, to taste. Serve.
     

    Wednesday, July 3, 2013

    eggplant tomato basil pizza {working with yeast}


    The Fourth is coming and what better way to send it off with than a lovely veggie pizza?

    My attempts at this very popular snack have gone less than perfectly. This time I waited too long to use the dough, what with life getting in the way and all, and it didn't turn out very tasty.

    The colorful toppings however went really well with each other, so this dish bares repeating... when I have the time to make it as the recipe indicates.

    Pizza Toppings
    Olive oil
    Salt and pepper
    1 ball mozzarella cheese, sliced
    1-2 ripe tomatoes, sliced
    1/2 small eggplant, thinly sliced
    10 basil leaves (placed on top, right after pizza comes out of oven)

    {dough recipe}

    Monday, May 6, 2013

    ramp focaccia {working with yeast}

    I am a shameless eavesdropper. I can't help myself. And NYC is the perfect place for it. People are having personal conversations everywhere.

    This morning while walking through the Union Square Farmer's Market on my way to work (yeah, I know, cool, right?), I over heard a woman saying, What have I been making? Well, I have done the ramps to death, of course. Ramp pizza, ramp focaccia...

    I immediately turned to the farmer on my right and bought a package of ramps (I am a sucker for suggestive messages). I have been meaning to learn how to make really good bread. Bread you can sink your teeth into and devour fresh out of the oven. So, here is my first go at working with yeast: ramp focaccia. Bonus is it is a vegan dish!

    {recipe}


    And now for the winner of my book giveaway...


    ... the winner is... Laura!

    Please send me your address and I will send it off to you right away. Thank you to everyone who commented. I will have more book giveaways in future.


    Wednesday, March 13, 2013

    skillet cornbread salad {panzanella}


    This savory cornbread is really hearty with a nice crunch. The first night we ate it with corned beef and cabbage. Next I made a Mexican inspired salad. I got the idea for this here.

    If I make it again I will cut the salt by one half which might release more of the natural sweetness of the corn, since the recipe calls for no sugar. It was perfect straight out of the oven with a teaspoon of maple syrup drizzled on top.


    {skillet cornbread recipe}

    But then what to do with the whole loaf? In researching a plan I came across How Sweet It Is' Black Bean and Cornbread Panzanella. I was intrigued. What was panzanella? It turns out to be a Florentine tomato and bread crumb salad dish which was originally made with only onions and toast, topped with oil and vinegar. Today it can be all kinds of things. Smitten Kitchen's Corn Bread Salad
    includes lots of tomatoes, which works in summer but now is not a great idea, unless you like them hot-housed.

    So I opted for the more Mexican style that How Sweet It Is went with and I was not sorry I did. It was a fresh breath of summer in these teasing days of spring when the green grass and warm sun are just fingertips away, you can almost smell them.

    {salad recipe}


    Friday, March 1, 2013

    herbed whole grain flat bread with red onions


    Working my way up to the big, bad, behemoth of yeast breads, I stumbled across a gem of a recipe. Super easy to make and a lot of bang for your buck, these flat bread slices are bursting with flavor and so pretty with the swirls of red onion throughout. I tried this same recipe out in a smaller pan {10 inch skillet} and it was thicker which made it less easy to eat and not quite as nice. So if you make this use a large baking pan. Mine was a 9 x 12 pan and it worked out just fine.

    Whole Grain Flat Bread from Mark Bittman's the Food Matters Cookbook
    1 cup whole wheat flour
    1 teaspoon salt
    4 tablespoons olive oil
    1/2 large onion, thinly sliced
    1 tablespoon fresh rosemary leaves, sage leaves and thyme leaves
    1. Put the flour into a bowl; add salt; then slowly add 1 1/2 cups water, whisking to eliminate lumps. Cover with a towel, and let sit while oven heats, or as long as 12 hours. The batter should be about the consistency of thin pancake batter.
    2. When ready to bake, heat the oven to 450°F. Put the oil in a 12-inch rimmed pizza pan or skillet (along with the onion and rosemary if you’re using them) and put in the heated oven. Wait a couple of minutes for the oil to get hot, but not smoking; the oil is ready when you just start to smell it. Carefully remove the pan (give the onions a stir); then pour in the batter, and return the skillet to the oven. Bake 30 to 40 minutes, or until the flatbread is well browned, firm, and crisp around the edges. (It will release easily from the pan when it’s done.) Let it rest for a couple minutes before cutting it into wedges or squares.